Foundation Repair Process
Foundation Repair Process – What to Expect
Step by Step Walk Through – Foundation Repair Process and What to Expect
Understand the foundation repair process and what to expect. Yes foundation repairs are a major event but prepare yourself by knowing what to expect. It eases worries, sets expectations and is a shining light at the end of the tunnel. Follow us through a full house foundation repair lift. It is the best way to highlight the process and help explain what to expect.
This North Texas home has approximately 4800 SF. It needed an over-lift of six plus inches. Typically this means lifting the entire house to a level (or nearly level) condition. Then the structure is “over-lifted” an additional amount. This helps prevent future soil movement from impacting the structure after the foundation repair has been completed.
- Pilings need to be placed around the entire perimeter beam.
- The Perimeter beam is the outer edge of the foundation
- Pilings are columns that are pushed into the ground under a foundation. This puts your house on a firm foundation.
- Tunnels are dug underneath the home. These run under the slab at intervals from one end of the home to the other. They are needed to gain access to all interior foundation beams.
- The under side of a foundation looks like a waffle. The thicker parts of the waffled underside are called the foundation beams.
- Tunnels are dug underneath the home. These run under the slab at intervals from one end of the home to the other. They are needed to gain access to all interior foundation beams.
A/C Pads need to be lifted. The pads are what the A/C units rest on. When the house is lifted, everything next to the house moves up. Lifting the A/C pads in the preparation stage helps all the A/C connections move with the lift. Connections in the ground are uncovered to allow them to move freely during the lift.

Once the foundation repair lift is completed, landscaping is put back in place and connections are covered back up with soil.
There are often areas of asphalt or concrete like garages or driveways that require a “breakout”. A “breakout” is where the solid surface is broken through so that the foundation beams can be reached. Breakouts are patched after the lift.
This is a foundation repair garage floor breakout. When completing a full-lift foundation repair, it is often necessary to break through the garage floor to reach the beam located under the garage. In this photo, two post tension cables have been exposed. The cables reinforce the foundation.
After the foundation repair lift, breakouts and driveway are repaired. The arrow is pointing to where concrete has been poured to cover the breakout.
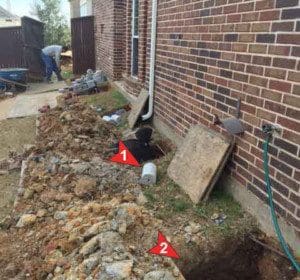
Prior to lifting, the plumbing and electrical services are exposed. There will often be plumbing repairs required with a significant foundation repair lift. Notice the plumbing has been uncovered. This is before the foundation repair lift.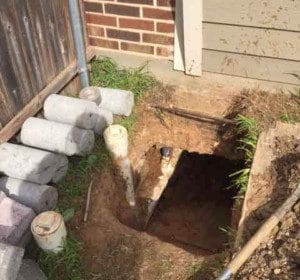
This is the same plumbing post-lift. Much to his dismay, our guy is getting a shower. A leak has sprung and needs to be repaired.

Prior to lifting, the utilities (gas, electric, etc) are exposed. This is to help prevent damaged during the lifting process. Utilities need the room and air space to move with the lift. Without this flexibility they will break. Notice where the arrow marks the ground surface.

Notice where the arrow marks the ground surface after the house has been lifted. The utilities moved with the lift. There was no damage to the utilities during or after the foundation repair lift.

Remember the tunnels that were dug. They will now be used to access each beam under the home. Under slab tunnels are about 3 feet wide x 3 feet deep. It is just enough space to allow the technicians to maneuver under the home. Foundation repair pilings will be placed under each beam at 8-10 feet intervals.
Hydraulic jacks go inside the tunnels. Placed under the foundation beams, they will lift the home to the correct level.
Support cylinders are then placed under the beams and shimmed to the proper height.
Notice the gaps that appear after the lift. Also notice the clean concrete exposed during the lift. Repairs to driveways and other flat work are done where needed.

The house has been lifted a total of 12”. Notice how the dirt along the back has lifted up with the house; a full 12”. Any plants, gate posts, or other objects next to the house would have been lifted, and would tilt away from the house. It is time for our crews to start the clean up. This is where it all starts coming together. In the foreground, we have lowered the dirt back to its original elevation. Any other objects that had been lifted out of position will also be put back to rights.
Here is another side of the house after the completion of the job. Everything has been picked up. The dirt around the foundation is back in place.
Tunnel entrances are closed. The tunnels remain intact to allow under slab access for any future plumbing repair or piling adjustments. A gravity or sump pump drain is installed to drain water from the tunnels. This is for the foundation drainage pipe.
Landscaping is put back in placed.
The house has been lifted. Clean up is finished.
This is the front of property after completion of a 12” full lift foundation repair.
We hope this walk through helps to understand the foundation repair process and what to expect. The initial process can be chaotic. Remember that once the lift is done, order is restored. The chaos becomes order and the home is left resting on a firm foundation.
About the Author
Frederick Marshall is the CEO of Advanced Foundation Repair, LP, a foundation repair company specializing in home repairs from the foundation up including foundation repair, foundation drainage, exterior foundation waterproofing, foundation irrigation, and plumbing services. Advanced Foundation Repair has specialized in foundation repair needs of Texas homeowners for over 100 years.
Get a Detailed Inspection!